
Soups & Stews
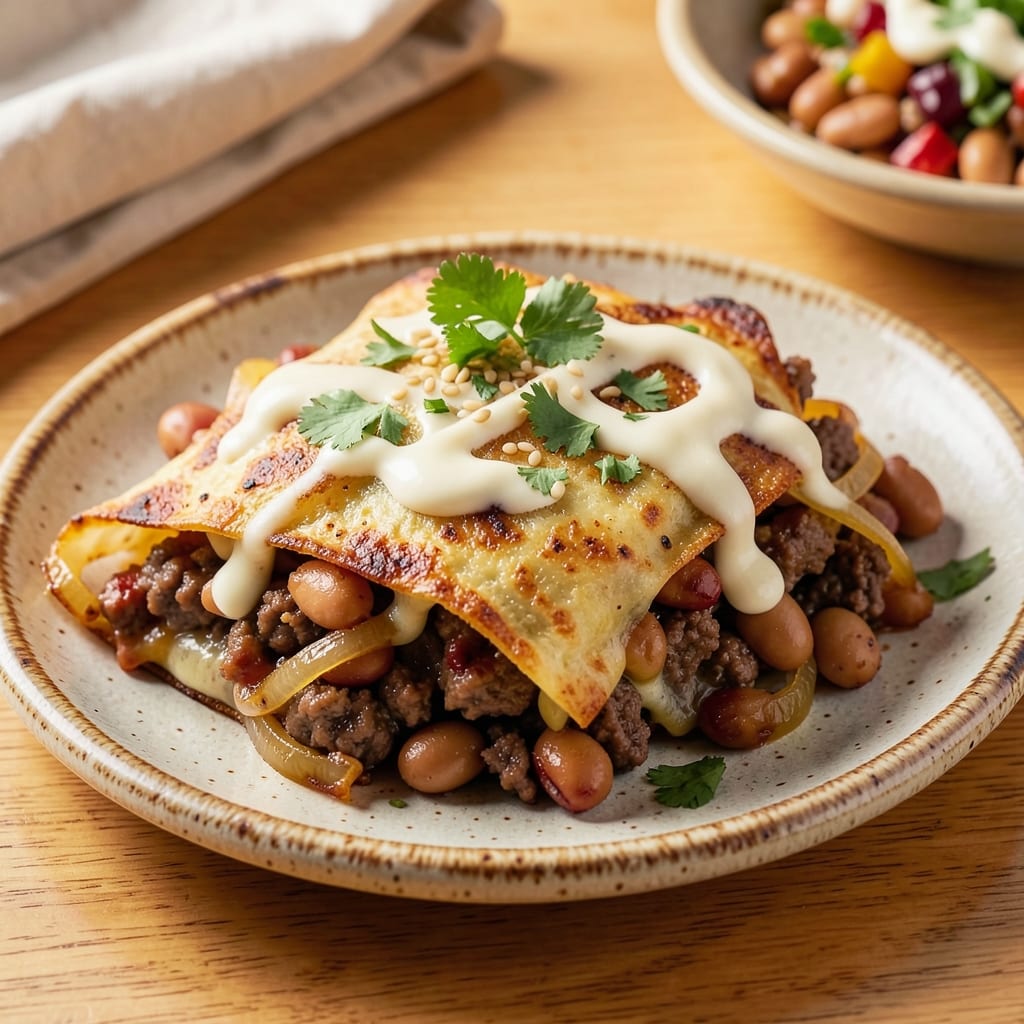
This beef and bean chimichanga recipe delivers the perfect balance of crispy tortilla edges and hearty, spiced filling in every bite. The secret lies in properly seasoning the beef and beans, then wrapping them in warm tortillas before achieving that signature golden crunch through frying or baking. I developed this version after years of testing—it's the one my family requests every time we make it.
The filling starts with tender beef and flavorful pinto beans simmered in a blend of cumin, chili powder, and garlic, creating a rich, savory base. Large flour tortillas provide the perfect canvas for wrapping, while the frying process transforms them into crispy, golden pockets that hold up to every bite. For a lighter option, you can air-fry instead, though traditional frying delivers that classic crunch.
What you'll end up with is a dish that's crispy on the outside, tender on the inside, and packed with layers of Mexican-inspired flavor. The combination of spiced beef, hearty beans, and crispy tortilla creates a satisfying meal that's perfect for game day, Taco Tuesday, or any night you crave something hearty and delicious. Serve with sour cream, salsa, and guacamole for the full experience.
This recipe serves four, making it ideal for sharing, and the leftovers reheat beautifully—just warm them in the oven to restore that crispy texture. The technique is straightforward, but the results are restaurant-quality, proving that you don't need to be an expert to make impressive Mexican-inspired dishes at home.
Ingredients for beef and bean chimichanga
Crispy tortillas meet hearty spiced filling—this recipe delivers restaurant-quality chimichangas at home.
| Ingredient | Amount | Notes |
|---|---|---|
| Ground Beef (Chuck) 🥩 | 1 ½ lb | Lean-to-fat ratio 80/20 preferred |
| Pinto Beans (Drained) 🌽 | 2 cups | Canned or cooked, no salt added |
| Yellow Onion 🧅 | 1 whole | Medium size, diced |
| Garlic Cloves 🧄 | 4 cloves | Fresh, minced |
| Ground Cumin 🌿 | 1 tbsp | Toasted for deeper flavor |
| Chili Powder 🌶️ | 2 tbsp | Medium heat preferred |
| Olive Oil 🫒 | 2 tbsp | For cooking beef |
| Beef Broth 💧 | 1 cup | Low sodium preferred |
| Flour Tortillas 🌯 | 4 whole | Large, 10-inch size |
| Salt 🧂 | 1 tsp | Kosher or sea salt |
| Black Pepper 🌶️ | ½ tsp | Freshly ground |
| Vegetable Oil 🫒 | ½ cup | For frying tortillas |
| Lime 🍋 | 1 whole | Juiced for serving |
| Fresh Cilantro 🌿 | ¼ cup | Chopped, for garnish |
The beef is where the magic starts. Chuck roast gives you that perfect mix of tenderness and flavor—sirloin stays too lean. Grab it from the meat counter, not pre-ground, for better quality. Trader Joe's or Costco have great prices if you're doing a big batch. The pinto beans? Low-sodium canned saves you salt later. Rinse them if they're salted, but don't skip the broth—it's what makes the filling rich and flavorful. That said, if you're in a pinch, dried beans soaked overnight work too, but they won't be as quick.
No cumin? Smoked paprika at double the amount gets you close, though it won't be identical. Fresh garlic is ideal, but jarred minced garlic works in a bind—just use half the amount. The tortillas are non-negotiable—flour, not corn. They need to be pliable but not too soft, or they'll tear when wrapping. Warm them in a dry skillet for 30 seconds before filling. For the frying oil, vegetable or canola oil works best—it stays stable at high heat. Peanut oil is great too, but it's pricier. And if you're air-frying, spray with oil first to help with crispiness.
The filling keeps for 3 days in the fridge, but the tortillas are best used fresh. If you're prepping ahead, make the filling first and store it separately. The tortillas can be wrapped and frozen raw—just fry from frozen for 2-3 extra minutes. For serving, squeeze that lime over everything—trust me on this. The cilantro is optional, but it adds that fresh finish. Leftovers? Warm in a 350°F oven for 10 minutes to restore that crispy texture. They're even better the next day, honestly.
Why You'll Love This Recipe
- One-Pan Wonder: I swear by this recipe because it’s basically a "dump-and-go" meal. Sauté the onions and garlic, toss in the ground chuck and cumin, stir in those drained pinto beans—boom. The filling’s ready in 15 minutes while you fry or bake the tortillas. (Yes, even on a Tuesday night.)
- Umami Bomb: That combo of chuck beef and pinto beans? It’s like a flavor hug. The cumin and garlic turn the filling into something rich and savory, but the real magic happens when you deep-fry it—crispy outside, tender inside. Honestly, the first bite makes me forget it’s a weeknight dinner.
- Leftover Hero: Between us, this recipe begs to be made in bulk. The filling keeps for days in the fridge, and the chimichangas reheat like a dream—either crispy in the oven or soft in a skillet. I’ve fed a crowd with leftovers, and no one’s ever complained. (My secret weapon.)
- Budget Crunch: Ground chuck and canned pinto beans? That’s a wallet-friendly powerhouse. I stretch this filling into four or five chimichangas, and it’s still cheaper than takeout. Plus, the spices cost pennies—just enough to make it feel like a restaurant dish without the price tag.
Step-by-step instructions for beef and bean chimichanga
Here's how to create that perfect blend of spiced filling and crispy, golden tortillas—every bite is worth it.
Cook the Spiced Beef and Bean Filling
Heat the 2 tablespoons olive oil in a large skillet over medium-high heat. Add the 1 whole yellow onion and cook for 5 minutes until softened and translucent. Add the 1.5 lb ground beef (chuck) and break it apart with a wooden spoon, cooking until it loses its raw color—about 5-6 minutes. Here's the thing—don't drain the fat, it adds flavor to the filling.
Stir in the 4 cloves minced garlic, 1 tablespoon ground cumin, and 2 tablespoons chili powder, cooking for 1 minute until fragrant. Add the 2 cups drained pinto beans and 1 cup beef broth, then bring to a simmer. Reduce heat to medium-low and let it cook for 8-10 minutes until the liquid reduces and the flavors meld together. Season with 1 teaspoon salt and 0.5 teaspoon black pepper. Remove from heat and let it cool for 10 minutes—this prevents the tortillas from getting soggy when stuffed.
Assemble the Chimichanga Filling
Spread ¼ cup of the cooled beef and bean mixture onto each of the 4 large flour tortillas, leaving about 1 inch of border around the edges. This border is crucial—it helps seal the filling when rolled. Fold the sides inward first, then roll tightly from the bottom up, tucking in any filling that might peek out. You'll end up with four neat, cylindrical chimichangas ready for frying.
Here's a pro tip: If the filling seems too loose, chill the tortillas in the fridge for 10 minutes before rolling—they'll hold their shape better. Wrap them in plastic wrap and keep them refrigerated until you're ready to fry. This step ensures everything stays together and crispy.
Fry to Crispy Perfection
Heat 0.5 cup vegetable oil in a large skillet over medium heat until it reaches 350°F—use a thermometer to check. Fry one chimichanga at a time, turning occasionally, for 3-4 minutes per side until deep golden brown and crispy. The oil should sizzle gently, and you'll see the tortilla develop a beautiful, even color. Don't overcrowd the pan—this keeps the oil temperature steady and ensures even cooking.
Transfer the fried chimichangas to a paper towel-lined plate to drain excess oil. Keep them warm in a 200°F oven while you fry the remaining ones. The key to crispy chimichangas is patience—rushing will leave you with soggy tortillas. Trust the process and let the oil work its magic.
Serve with Lime and Cilantro
Slice each chimichanga into 1-inch pieces and arrange them on a serving platter. Squeeze the juice from the 1 whole lime over the top and sprinkle with 0.25 cup chopped fresh cilantro. The bright acidity of the lime cuts through the richness of the beef and beans, while the cilantro adds a fresh, herbal finish. Serve immediately while everything is hot and crispy.
Real talk: The first bite is always the best. That perfect crunch from the tortilla gives way to the spiced beef and beans, and the lime and cilantro tie it all together. If you're feeling fancy, serve with a side of sour cream, guacamole, or a simple slaw to balance the flavors. Enjoy your chimichangas while they're still crispy—this dish doesn't wait!
Pro Tips For Making Beef And Bean Chimichanga
- Brown the Beef First: Chuck roast has fat that needs to render, or you’ll end up with dry, tough filling. Cook the beef over medium-high heat until it loses its raw color—about 5-7 minutes—before adding onions or beans. I learned this the hard way when my first chimichanga filling tasted like overcooked hamburger.
- Toast the Cumin: Bloom that ground cumin in the pan for 30 seconds before adding onions. This releases its aroma and prevents it from tasting like dust. Skip this, and your chimichanga filling will lack depth—trust me, your nose (and taste buds) will notice.
- Prevent Bean Sog: Drain the pinto beans and rinse them in cold water to remove excess starch. Pack them into the tortilla loosely—too many beans mean a soggy, broken chimichanga. I used to cram them in like a burrito, and half the filling ended up on my plate.
- Upgrade with Onion Sweat: Cook the onions until they’re translucent and slightly caramelized (about 8-10 minutes) before adding garlic. This adds sweetness that cuts through the richness of the beef. Sounds like extra work, but it’s the thing that makes your chimichanga taste restaurant-worthy.
Regional styles of beef and bean chimichanga
Southwest Tex-Mex Style
In Southwest Texas, chimichangas often feature a spicier kick with extra chili powder and a touch of smoked paprika—I like adding ½ teaspoon of the latter for depth. The filling here gets a dash of oregano and a splash of beer (like Corona or Modelo) instead of broth for a lighter, crispier texture. Serve with pickled jalapeños and avocado crema for that authentic Tex-Mex flair. 🌶️
California Fusion Twist
California chefs love to deconstruct chimichangas—try spreading the filling on a warm tortilla, topping with shredded lettuce, pico de gallo, and cotija cheese, then rolling and frying. For a vegetarian version, swap the beef for black beans and corn, then add avocado slices and cilantro-lime crema. This style keeps the crispy exterior while adding fresh, bright flavors. ✨
New Mexico Green Chile
New Mexico’s answer to chimichangas swaps the traditional filling for green chile stew—use 2 cups of roasted green chile (like Hatch chile) blended with the beef and beans. Add 1 teaspoon ground coriander and ½ teaspoon cinnamon for warmth. Serve with sour cream and chopped scallions for a smoky, earthy twist that’s all about the chile. 🔥
Arizona Sonoran Style
Arizona’s Sonoran chimichangas are extra-crispy and often baked instead of fried—wrap the filling in a large flour tortilla, brush with olive oil, and bake at 375°F for 20-25 minutes until golden. Top with crumbled queso fresco, diced tomatoes, and sliced radishes for a lighter but still flavorful take. This version is perfect for hot days when you want to skip the oil. 🌵
Tijuana Street Food
In Tijuana, chimichangas are street food gold—fry them in lard for an ultra-crispy crust and serve with salsa verde, crumbled chorizo, and queso fresco. For a spicy kick, add diced serrano peppers to the filling. This style is all about bold flavors and texture, making it a crowd-pleaser for any gathering. 🌟
Modern Air-Fryer Version
For a healthier twist, air-fry the chimichangas at 375°F for 12-15 minutes, flipping halfway. Spray with olive oil before cooking to help crisp the tortillas. This method cuts oil by 70% while keeping that golden crunch. Pair with mango-habanero salsa for a sweet-spicy balance that’s perfect for summer. 💫
Nutrition facts
Frequently asked questions
Can I make chimichangas ahead of time?
Assemble the chimichangas (without frying) and wrap them tightly in plastic wrap. Store them in the fridge for up to 24 hours before frying. For freezing, wrap them individually and freeze for 1 month. Fry from frozen, adding 2-3 extra minutes per side. To reheat leftovers, warm in a 350°F oven for 10 minutes to restore crispiness.
What's the best way to make the tortillas extra crispy?
Start with warm tortillas—heat them in a dry skillet for 30 seconds before filling. Use 350°F oil and fry one chimichanga at a time, turning occasionally for 3-4 minutes per side. For even more crunch, chill the assembled chimichangas for 10 minutes before frying—they'll hold their shape better. Air-frying at 375°F for 12-15 minutes also works but requires spraying with oil first.
Can I substitute the beef for something else?
Yes! For a vegetarian version, swap the beef for 1.5 cups of black beans and 1 cup of corn, then add 1 teaspoon cumin and 1 teaspoon smoked paprika to the filling. For a chicken version, use 1.5 lbs of ground chicken and reduce the chili powder to 1 tablespoon to balance the milder flavor. Just ensure your filling stays moist enough to hold the tortilla together.
Why did my chimichangas turn out soggy?
Soggy chimichangas usually happen when the filling is too wet or the tortillas aren't crisped properly. Let the filling cool for 10 minutes before assembling to reduce moisture. Fry at the correct 350°F oil temperature and avoid overcrowding the pan. If using air-fryer, spray with oil and increase time to 15 minutes. Also, ensure your tortillas are flour, not corn, as they hold up better to frying.
What are the best toppings for beef and bean chimichangas?
Classic toppings include sour cream, salsa, guacamole, and chopped cilantro. For extra flavor, add pickled jalapeños, crumbled queso fresco, or avocado slices. A squeeze of lime juice brightens everything up. If you want a smoky twist, try green chile sauce or chipotle crema. Serve with a side of Mexican rice or refried beans for the full experience.